You’ll need to follow a precise sequence before pulling that starter cord or pressing the electric button. Start by opening the fuel valve and inserting the ignition key—without these engaged, your priming efforts won’t draw fuel properly. The cold temperature dictates how many times you’ll press that primer bulb. Two presses might suffice in mild conditions, but drop below freezing and you’re looking at four. Set your choke to full and throttle to fast, yet even with perfect preparation, there’s a critical mistake waiting that could leave you stranded in the snow.
Prepare Your Snow Blower: Fuel Valve and Ignition Key
Why begin anywhere else than the fuel system?
You’ll start by locating the fuel valve on your two-stage snow blower and rotating it to the open position, permitting unrestricted fuel flow to the carburetor.
Next, you’ll insert the ignition key into its receptacle, completing the starting circuit and enabling electrical continuity for subsequent operations.
Without this key properly seated, your priming efforts and ignition sequence can’t proceed.
You’re establishing the foundational conditions for combustion: fuel delivery path integrity and energized control systems.
These preparatory steps precede priming, which you’ll execute momentarily.
Remove one mitten now to ensure precise manual dexterity for the bulb presses ahead.
Once you’ve opened the fuel valve and secured the ignition key, you’ve created the necessary preconditions for fuel vaporization and ignition—proceed to choke engagement and throttle positioning.
Prime Your Snow Blower: 2 or 4 Presses Based on Temperature
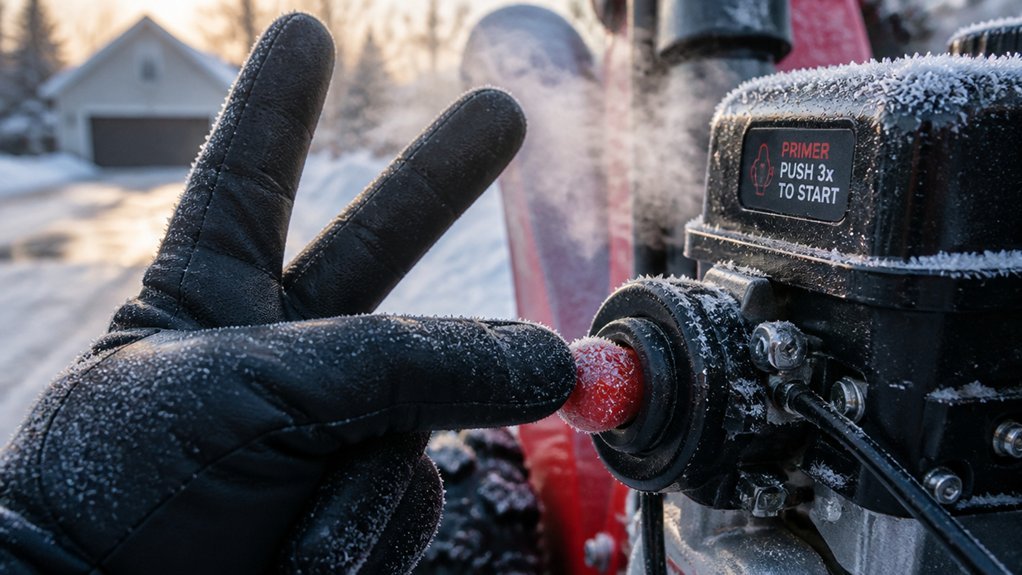
How precisely should you calibrate your priming routine? You’ll execute two presses of the primer bulb when the temperature registers 15°C (59°F) or warmer; drop below this threshold, and you’ll double your input to four presses. Remove one winter mitt to ensure consistent finger pressure and mechanical reliability during this operation. You’re metering fuel directly into the carburetor, so precision prevents flooding—excess priming generates gas fumes and hydrolocks the engine. If you’re restarting within five minutes, you won’t repeat this sequence; exceed that interval, and you’ll re-engage the full procedure including choke closure. Cold-temperature starting demands this calibrated priming approach, yet you’ll resist the impulse for additional presses beyond specification. You’ve completed fuel system preparation and will now position controls for ignition.
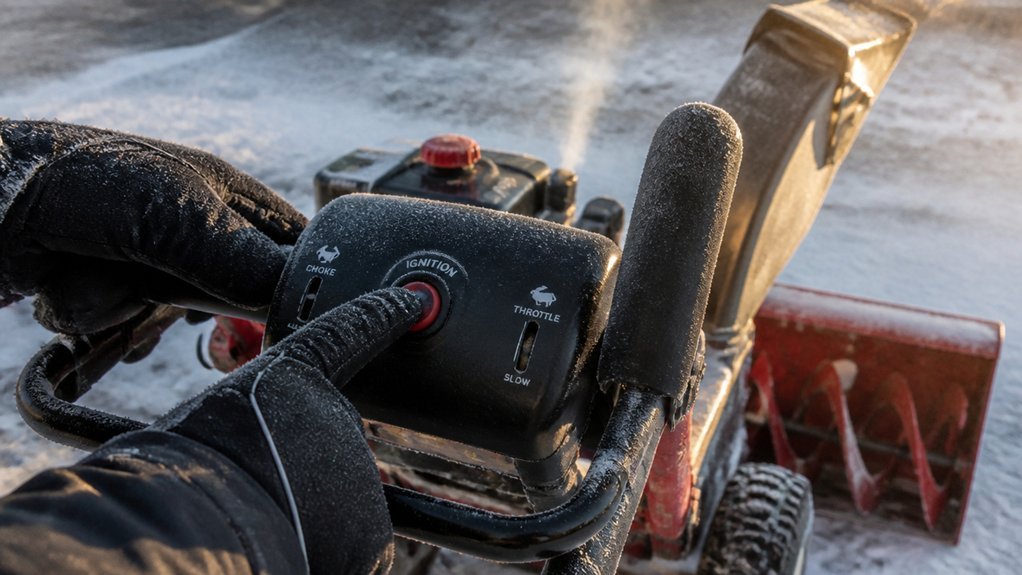
Set Your Snow Blower’s Choke and Throttle

Where precisely should you position the choke before ignition?
For cold starts, you’ll close the choke fully. When temperatures reach 30° F (−1° C) or warmer, you’ll set the choke half to three-quarters open. You’ll move the throttle to fast before starting to generate a stronger spark and accelerate engine warm-up. This choke and throttle configuration forms a critical phase of your starting procedure.
If you’ve shut off the engine within five minutes, you’ll restart with the choke in the run position without re-priming. After five minutes or more, you’ll close the choke and prime normally.
Once you’ve engaged the starter and the engine runs, you’ll gradually return the choke to run as the engine warms. If overpriming causes flooding, you’ll close the fuel shut-off, shut off the choke, pull the starter several times, wait 15 minutes, then reopen the fuel shut-off and restart.
Start Your Snow Blower: Recoil or Electric
When you’re ready to fire up the engine, you’ll engage the starter using whichever method your model employs—either grip the recoil starter handle and pull sharply, or depress the electric starter button while ensuring the machine’s plugged into a grounded outlet. Keep the choke fully closed for cold starts; set it partially open when temperatures exceed 30°F. You’ll start the engine without cranking continuously—use five-second bursts with ten-second intervals between attempts. Limit yourself to ten total tries. If you used the electric starter, you’ll unplug the extension cord immediately once the engine catches to prevent damage. Should the engine fail to start after repeated attempts, you’ll reopen the choke slightly before retrying. Persisting failure requires consulting your manual or seeking professional repair.
Warm Up Your Snow Blower and Adjust the Choke
Original text (word-for-word):
Once the engine catches, you’ll manage the choke position to regulate the fuel mixture during warm-up. For temperatures below 30°F (−1°C), you’ll keep the choke fully closed; at 30°F or warmer, you’ll open it to half or three-quarters position. You’ll monitor engine behavior during this critical warm-up phase, ensuring it reaches stable idle before advancing the throttle. You’ll then transition the choke to the run position once the engine has properly warmed.
For restart procedures, you’ll apply different strategies based on downtime. If the engine stopped exceeding five minutes ago, you’ll close the choke and prime per standard starting protocol. If shutdown occurred within five minutes, you’ll restart without choke adjustment. These protocols optimize fuel delivery, prevent flooding, and ensure reliable engine response across varying thermal conditions and operational interruptions.
Your Snow Blower Won’t Start? Check for Flooding First
Because fuel fumes during startup signal overpriming, you’ll need to identify flooding before troubleshooting other components. Flooding occurs when excess fuel saturates the engine, preventing ignition. You’ll detect this through a strong fuel odor or white smoke from the muffler.
To clear a flooded engine, close the fuel shut-off valve if equipped, shut off the choke, and pull the recoil starter three times. Wait fifteen minutes to let excess fuel evaporate. Overpriming and flooding typically follow multiple failed starts, so limit cranking to five minutes total and allow cooldown periods between attempts.
After clearing, reopen the fuel shut-off valve, adjust the choke appropriately for engine temperature, and retry starting with minimal priming. If the engine still won’t start, consult your manual or a Toro dealer.
Protect Your Snow Blower’s Electric Starter: Cranking Rules
Flooding isn’t the only risk during startup sequences—you’ll also need to guard your electric starter against thermal damage. Limit each cranking interval to five seconds, then pause for ten seconds minimum. This cooldown period prevents motor overheating and preserves starter integrity. Never hold the starter engaged continuously; intermittent operation is essential for safety and component longevity.
After the engine fires, immediately disconnect your extension cord. Sustained electrical connection risks circuit overload and permanent starter damage. Monitor your attempt count—discontinue after ten cycles. Persistent failure indicates mechanical issues requiring professional diagnosis, not repeated cranking.
If the starter emits whining or grinding noises during operation, halt immediately. Inspect extension cord integrity and plug connections; resistance from faulty wiring strains motor windings. These protocols ensure reliable electric starting without compromising critical safety systems.
Restart Your Snow Blower If You Shut Down Recently
Why risk engine damage when a brief pause prevents costly repairs? If you shut down recently, you must wait fifteen minutes before you attempt a restart. This interval prevents flooding caused by residual overpriming. Once elapsed, you’ll close the fuel valve, switch the choke to the off position, and pull the recoil grip three times to evacuate excess fuel. Next, you’ll reopen the fuel valve, set the choke to run, and engage the electric starter or recoil. If ignition occurs but operation proves erratic, you’ll modulate the choke gradually toward open as thermal equilibrium establishes. Should the restart fail, you’ll permit another fifteen-minute cooldown period. Persistent malfunction requires consultation of your Toro manual or an authorized dealer for advanced troubleshooting protocols.
5 Snow Blower Maintenance Tips for Easy Starting
What separates a snow blower that roars to life on the first pull from one that sputters and stalls in subzero conditions? Rigorous preventative maintenance. You eliminate starting failures by using fresh fuel—less than 30 days old—or adding stabilizer to preserve fuel integrity for 4–6 months, preventing gum deposits in the carburetor. You replace a questionable spark plug annually and verify the spark plug wire seats firmly onto the terminal. You check and change engine oil per manufacturer intervals, ensuring proper lubrication for 4-cycle engines. You inspect rotor blades, scraper bars, and drive belts yearly, tightening or replacing worn components per specifications. You maintain the starting system through consistent oil changes, fuel management, and adherence to factory maintenance schedules.
Conclusion
You’ve prepared the fuel system, primed appropriately for temperature conditions, configured choke and throttle settings, and executed the starting sequence within operational limits. Your snow blower’s ignition system requires proper fuel-air mixture and electrical connectivity. Monitor engine response during warm-up, adjust choke progressively, and adhere to cranking intervals to preserve starter motor integrity. Regular maintenance ensures reliable cold-weather starting performance.