Your riding mower sits silent when you turn the key, and you need answers fast. You’ve checked the obvious—fuel, battery, connections—but the engine won’t catch. Before you start replacing parts at random, you’ll want to follow a systematic diagnostic path that isolates the real culprit. The problem might be simpler than you think, or it could signal deeper mechanical trouble.
Start Here: Safety Checks Every Riding Mower Needs
Where should you begin when your riding mower refuses to fire? You’ll implement safety-first protocols before any diagnostic work.
First, you’ll disengage the blades or switch off the PTO completely—you’re eliminating contact hazards and mechanical rotation risks. Next, you’ll set the parking brake fully and verify engagement; an unsecured machine creates crushing dangers during inspection.
With controls locked, you’ll kill the engine. You’ll recheck fuel level and assess freshness, replenishing with new gasoline if you’ve detected degradation. You’ll examine the air filter for blockage or contamination, replacing it when intake restriction compromises combustion.
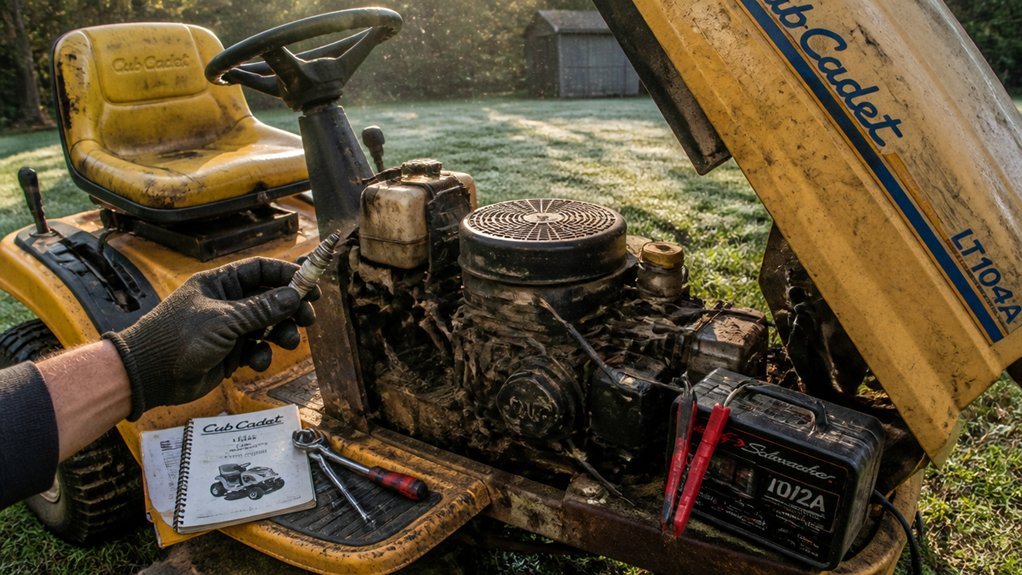
If you’ve encountered coughing or backfiring, you’ll inspect the spark plug’s condition and electrode coloring—you’re reading carbon deposits, oil fouling, or heat damage to pinpoint ignition failure. This systematic approach isolates mechanical from electrical faults efficiently.
Is Bad Fuel Stopping Your Riding Mower?

How quickly are you ruling out fuel degradation when your mower cranks but won’t catch?
You need to examine fuel quality immediately. Ethanol-blend fuel degrades within 30 days, reducing octane and forming varnish that clogs carburetors and fuel injectors. This contamination restricts flow through fuel filters, starving your engine and preventing ignition.
You must check diagnostic indicators: remove the spark plug and inspect for wet fuel residue, detect strong fuel odors, or identify visible leaks around the carburetor. These symptoms confirm degraded fuel or delivery problems.
If your fuel exceeds 30 days, drain the tank completely. Refill with fresh, ethanol-free or properly stabilized fuel. This eliminates poor ignition, restores proper atomization, and prevents sputtering or hard starting. You can’t skip this step—bad fuel mimics electrical failures but requires chemical, not component, solutions.
Check Your Air Filter for Starting Problems

Your fuel system may check out fine, yet the engine still won’t catch—now it’s time to scrutinize airflow restriction. A clogged air filter chokes the engine, starving it of oxygen and creating a rich fuel mixture that prevents ignition.
Remove the air filter housing and inspect the element. You’ll find debris, oil saturation, or physical damage blocking proper airflow. Replace the air filter immediately if it’s compromised—don’t attempt cleaning when saturation’s present. A restricted air filter causes hard starts, sputtering, or complete failure to fire.
Make air filter inspection part of your routine maintenance schedule. Check it regularly and swap it seasonally to prevent starting problems. If you’ve installed a clean air filter and the engine still won’t start, you’ll need to examine fuel delivery, compression, and ignition components next.
Test and Read Your Spark Plug Color
Why examine the spark plug first? You’ll quickly identify ignition problems by reading spark plug color. Remove the plug and inspect its electrode and insulator against manufacturer specifications for your model.
Light tan or grayish-brown deposits indicate healthy operation. Black, sooty fouling points to rich fuel mixture or air restrictions. Oily deposits reveal internal oil flooding. Dry white or blistered insulators signal detonation or lean mixture—both demand immediate replacement.
Worn electrodes with rounded edges mean you’ve exceeded the maintenance interval. Consistently abnormal spark plug color exposes carburetor malfunctions, fuel quality issues, or filtration problems. Compare your findings to service guidelines and install a new plug when readings deviate from normal tan deposits. Replace at recommended intervals regardless of appearance.
Is Your Choke Working and Oil Level Full?
Where might simple oversights be blocking your ignition sequence? Verify your choke mechanism engages fully during starting. You’ll ensure a fuel-rich air mixture reaches the cylinders when the choke plate closes completely. Check the choke cable for binding or detachment.
Pull the dipstick and confirm oil reaches the full mark. You’re risking internal damage when levels drop low; repeated losses demand immediate authorized service center evaluation.
Inspect your air filter—you’ll locate restriction points that starve the engine. Remove and hold the air filter to light; replace when dirt obscures passage. You’ve eliminated two critical failure modes when choke function and oil level check satisfactorily.
If starting failures persist, examine your previously tested spark plug for fouling indicators despite proper choke operation.
Decode Service Monitor Warnings on Troy-Bilt Models
When did that warning icon illuminate on your dashboard? You’ll need to decode it immediately. Troy-Bilt service monitors display model-specific alerts that pinpoint exact failure points rather than forcing blind troubleshooting.
Check your display for air filter symbols—restricted airflow triggers these warnings when sensors detect pressure differentials across the filtration element. You’ll identify battery alerts through separate voltage indicators. Each icon varies by manufacturing year and engine series, so cross-reference your specific model number against the technical documentation.
Don’t ignore these diagnostics. The monitor performs continuous system surveillance, transforming vague symptoms into actionable data. When you see an air filter warning, remove and inspect the element for debris saturation or physical damage. Replace using genuine specifications. Contact authorized support channels when alerts persist after component servicing.
Spot Internal Engine Damage From Low Oil
How quickly can you distinguish between normal operational wear and catastrophic failure? You’ll recognize internal damage from low oil by specific failure signatures: metallic knocking from rod bearing degradation, power loss across all RPM ranges, misfires during combustion cycles, and excessive exhaust smoke indicating ring or piston compromise. Low oil reduces film strength between rotating assemblies, accelerating adhesive and abrasive wear until components seize.
Don’t operate the unit further when you’ve identified these symptoms. Persistent low oil levels signal worn seals, gasket breaches, or excessive consumption from ring blow-by—each requiring borescope inspection and measurement of journal clearances. You’ll prevent catastrophic failure by checking dipstick levels before each operation, maintaining manufacturer’s specified viscosity and capacity, and adhering to drain intervals. When damage is suspected, you’re stopping immediately and contacting authorized service for teardown evaluation.
Riding Mower Still Won’t Start? Advanced Diagnostics
Why won’t your riding mower fire despite ruling out the obvious culprits? You’ll need engine diagnostics to verify the engine receives fuel, air, and spark. Check fuel pressure, inspect the air filter condition, and examine the spark plug color—white indicates lean operation, while dark fouling signals rich fuel mixture.
If the engine’s choked and still won’t start, you’ll inspect carburetor jets and needles for varnish buildup impeding fuel delivery. Monitor diagnostic indicators or service alerts for battery or air filter conditions guiding targeted repairs.
When basic checks fail, you’ll perform engine compression testing to rule out internal damage—worn rings or a blown head gasket often cause persistent no-start conditions. For unresolved issues, you’ll schedule service with an authorized Troy-Bilt dealer accessing genuine parts and advanced diagnostics through official support channels.
When to Get Professional Help for Starting Issues
Although you’ve verified fuel delivery, air intake, and ignition components, persistent starting failure typically indicates faults beyond routine maintenance scope—you’ll need professional intervention.
When starting issues resist resolution through standard troubleshooting, contact a local authorized servicing dealer immediately. These technicians perform advanced diagnostics inaccessible to typical owners, identifying internal engine damage, compression loss, or electrical faults requiring specialized equipment.
Professional diagnosis eliminates guesswork. Service centers employ factory-trained mechanics who understand complex starting issues specific to your model’s engineering specifications. They source genuine replacement parts through official Troy-Bilt channels, ensuring proper fit and operational safety.
Access Parts & Support via official Troy-Bilt resources for manuals and preliminary guidance. For urgent starting issues, utilize phone support, live chat, or service request forms. Timely professional engagement prevents further mechanical degradation and restores reliable ignition function.
Conclusion
You’ve traced fuel quality, air filtration, spark condition, choke operation, and oil level systematically. If the mower still won’t start, you’ve eliminated the common causes. Internal damage from low oil, compression failure, or electrical faults now require advanced diagnostics. At this stage, escalating to an authorized Troy-Bilt service center ensures proper testing with factory tooling and genuine replacement components.