You’ve likely felt the difference a loose chain makes—sloppy cuts, binding, or that dangerous slip off the bar. But overtightening wears your sprocket and strains the motor just as fast. Getting it right means knowing the exact deflection to aim for and why temperature changes everything after the first pull.
Why Chain Tension Matters
Why does chain tension deserve your attention before every cut? You’re preventing catastrophic failure. Proper chain tension stops kickback prevention from becoming compromised and keeps the chain secured to the guide bar; you’re protecting yourself from a detached chain striking your body.
Bar tension directly impacts operational safety. When you allow excessive slack, you create lateral movement that accelerates wear and destabilizes your cut. When you overtighten, you’re restricting bar rotation and generating dangerous heat buildup through friction.
During your first 30 minutes of operation, you’re checking repeatedly as components seat. Your practical target: approximately 6 mm (quarter-inch) deflection in both directions. If you’ve equipped auto-tensioning systems, you’re still verifying—machine assistance doesn’t replace your verification. You’re maintaining tension as a continuous responsibility, not a pre-operation checkbox.
How to Check Your Chain Tension
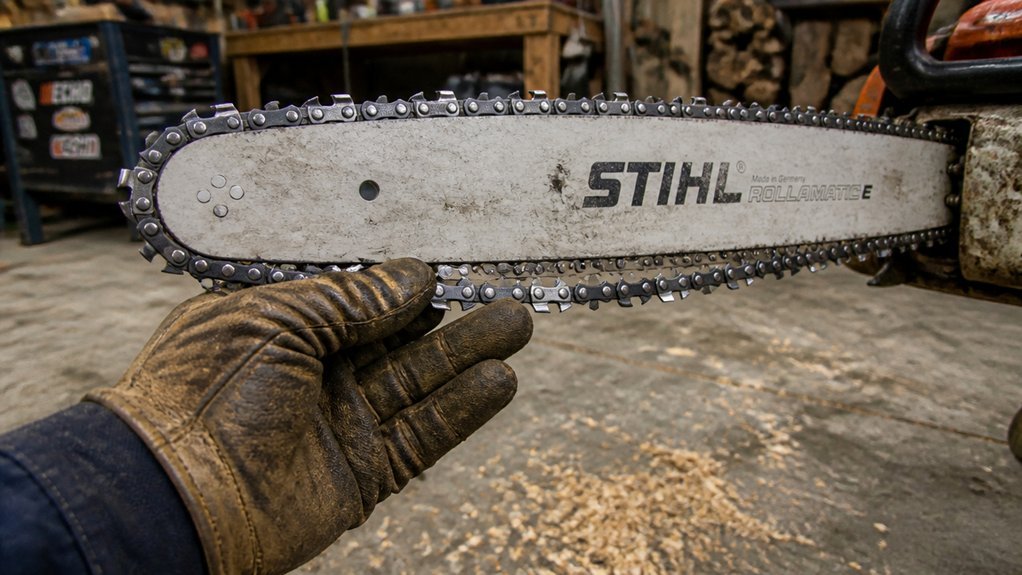
How do you know when your chain tension is correct? You’ll verify this through specific tactile measurements. First, ensure the engine’s off and the chain brake is engaged. Grip the chain mid-bar and lift it upward—proper chain tension allows about 1/4 inch of deflection in both directions.
Next, pull the underside of the chain downward with moderate pressure. You’re checking that 1–2 drive links become exposed and immediately snap back into the bar groove upon release. If the chain drags, binds, or fails to retract, your adjustment needs correction. Test movement along the bar by applying light pressure; the chain should glide smoothly without stiffness or excessive play. Precision here prevents operational hazards.
Quick Signs Your Chain Tension Is Wrong

What happens if you skip the quarter-inch deflection test? You’ll miss critical early indicators of improper chain tension that compromise your safety and equipment. When you pull the chain along the guide bar top, you’ll feel whether it’s snug yet free-moving. If it’s stiff and barely shifts, your chain tension is too tight—hindering bar rotation, generating excessive heat, and accelerating component wear. If it moves too easily or pops off gears, you’re running too loose, risking immediate derailment from the guide bar and severe kickback safety hazards. Watch for operational clues: a chain that stalls at idle suggests over-tightening; one that rattles or jumps indicates dangerous slack. These quick diagnostic signs demand immediate correction before you continue cutting.
How to Tighten a Standard Chainsaw Chain
Once you’ve identified improper tension through feel and visual inspection, you’ll need to correct it before operating the saw. First, power off the saw and engage the chain brake. Loosen the bar nuts slightly, then locate the tensioning screw beside the guide bar. Turn it clockwise to increase chain tension; you’ll see the guide bar nose rise as the drive links seat deeper in the bar groove.
Perform the snap test: pull the chain’s underside down until 1–2 drive links emerge from the guide bar groove. Release immediately—the chain must snap back flush. Verify lateral deflection measures roughly one-quarter inch. Tighten the bar nuts fully while lifting the guide bar nose. Recheck that tie-straps lightly contact the guide bar. Run the saw briefly, then recheck chain tension—new chains stretch rapidly.
How to Tension an Oregon Intenz Bar Chain
Tightening an Oregon Intenz bar chain requires using its built-in tensioning slot rather than a separate screw. You’ll loosen both bar nuts first, then insert a screwdriver or scrench into the Intenz slot and turn clockwise. This moves the bar forward, increasing bar tension until the chain seats properly against the bar rails.
Once you’ve achieved proper adjustment, tighten the mounting nuts—rear nut first, then front—while holding the bar nose upward. This prevents drive link pinching and maintains accurate alignment. You’re ready for a snap test when the chain resists sagging but still rotates freely by hand.
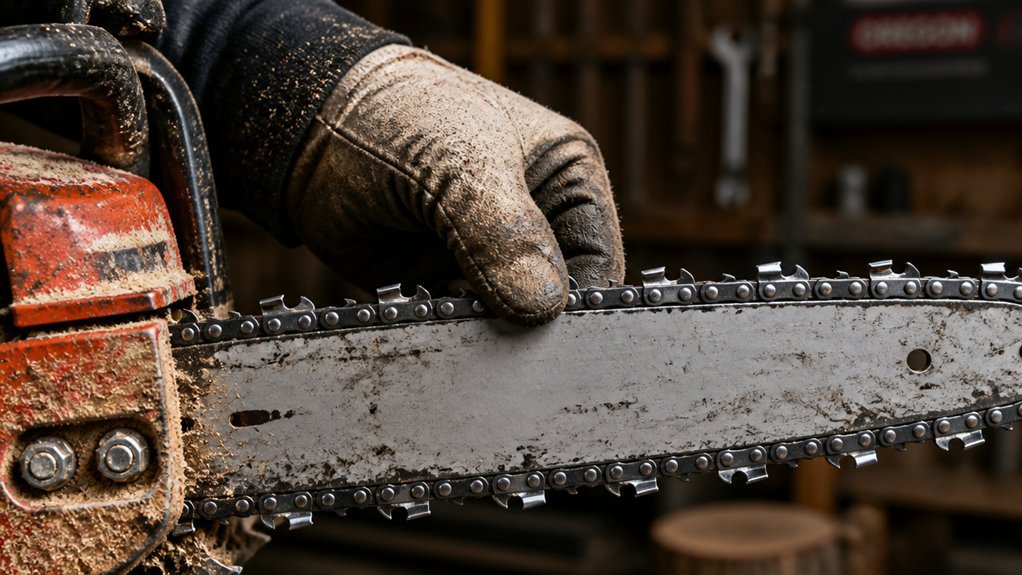
With a gloved hand, pull the chain along the bar’s top edge toward the nose; it should feel snug yet move smoothly without binding. Recheck bar tension during the first thirty minutes of operation, as heat and vibration alter chain fit on the Intenz bar.
Verify Tension With the Snap Test
How do you confirm that chain tension is spot-on without guesswork? You perform the snap test.
First, ensure the chain feels snug along the top of the guide bar yet pulls freely with a gloved hand.
Then grasp the chain’s underside between the guide bar’s nose and the engine housing.
Pull downward firmly to expose one to two drive links.
Release immediately.
The chain must snap back into position without hesitation.
If it sags or fails to return, you’ve got insufficient chain tension; tighten it before operation.
Conversely, if the chain barely moves or the guide bar feels stiff, you’ve over-tightened; loosen it promptly.
Recheck chain tension with the snap test during the first thirty minutes of use to maintain safe, precise cutting performance.
How Heat Affects Chain Tension
The snap test gives you a reliable starting point, but it doesn’t account for what happens after the saw runs. Heat expansion directly impacts chain tension as you operate the saw.
Both the chain and guide bar metal expand during heavy cutting, tightening the chain beyond its cold specification. You’ll notice reduced slack as drive links lengthen slightly from thermal expansion.
Without proper bar maintenance—keeping oiling ports clear and the bar face true—you compound binding risks from heat-related changes. Monitor for stalling or seizing; these warn you tension’s become excessive.
Auto tensioning systems help, but they don’t eliminate your responsibility to verify adjustment. You must recognize that thermal dynamics alter specifications between startup and operating temperature, demanding awareness beyond initial setup.
When to Recheck Tension During Use
Where exactly should you monitor chain tension once the saw’s running? You should focus your recheck schedule on the first 30 minutes of operation when thermal expansion and wear most aggressively alter chain tension.
After starting, pull the chain along the guide bar’s top; it must remain snug yet rotate freely. If movement’s stiff or barely perceptible, you’ve got excessive tension risking overheating and accelerated component wear. Conversely, if the chain’s loose enough to derail, tighten it immediately.
During operation, you can employ a deflection gauge standard: approximately one-quarter inch of side-to-side and vertical play indicates acceptable tension. Additionally, you must recheck chain tension if the engine stalls at idle—overtightened chains generate sufficient drag and heat to cause stalling and potential damage.
Check Your Manual for Model-Specific Targets
{While general recheck schedules and deflection gauges provide a workable baseline, your saw’s owner’s manual overrides any generic guidance with exact tension specifications tailored to your model. Consult this document to identify the precise chainsaw tension measurements, deflection allowances, and any auto-tensioning features unique to your equipment. Generic benchmarks—often near one-quarter inch of side-to-side movement—may not apply to your saw’s geometry or bar length.
Your manual establishes the definitive model-specific target, accounting for thermal expansion, component wear, and operational demands. You’ll find procedural steps for tensioning, service intervals, and troubleshooting when chains loosen repeatedly. After replacing bars, chains, or allowing cool-down periods, recheck against the manual’s specifications, as new hardware shifts baseline requirements. Adherence to manufacturer data prevents mechanical failure, chain derailment, and personal injury.}
Conclusion
You’ll maintain peak cutting performance and safety when you keep your chain at roughly 1/4 inch mid-bar deflection. Remember: you’re checking static tension, but heat changes everything. Recheck after the first 30 minutes of operation as the bar expands and the chain settles. Don’t trust your eyes alone—perform the snap test. Your manual’s specifications override any general guidance. Skip this routine, and you’re risking kickback, bar damage, or thrown chains.